Handling Users and User Data with React and Firebase
How to authenticate users and create data unique to users


Introduction
I thought my portfolio project would take no more than three days. After all, the concept was simple: Have users create or sign into their accounts, fill out forms, upload that form data to a database under their credentials, and have that data only accessible to the user who created it. However, while there were decent tutorials on how to add authentification to your project via Firebase, I did not find good instructions on how to handle user-specific data. This tutorial will walk through how to create sign-in and sign-out functionality in your React application with Firebase, and how to attach data to the authenticated user using Firebase's Realtime Database. This tutorial assumes you know basic React concepts such as useState and useContext.
🔒 Authentification
Setting up Firebase
1) First, you want to head over to the Firebase Console under your Google account sign-in. From here, you will see the option to add a project.

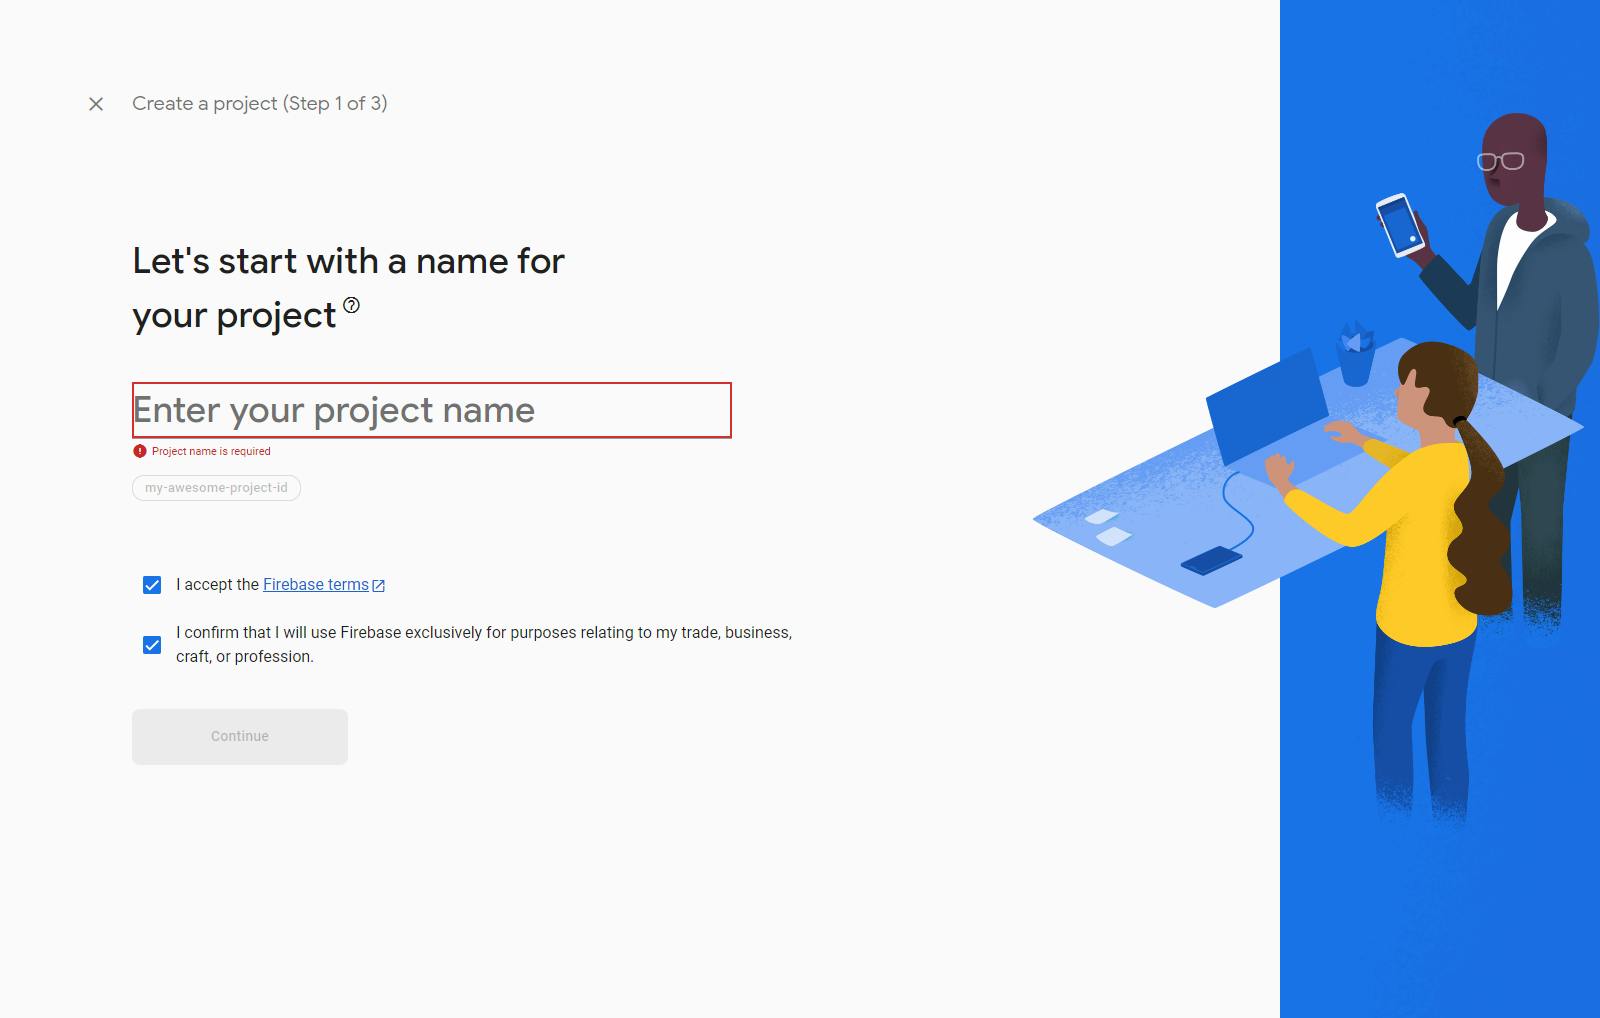
2) Fill out the simple form to create a Firebase project by entering a name of your choice, agreeing to the terms of agreement, and either opting into Google Analytics or opting out.
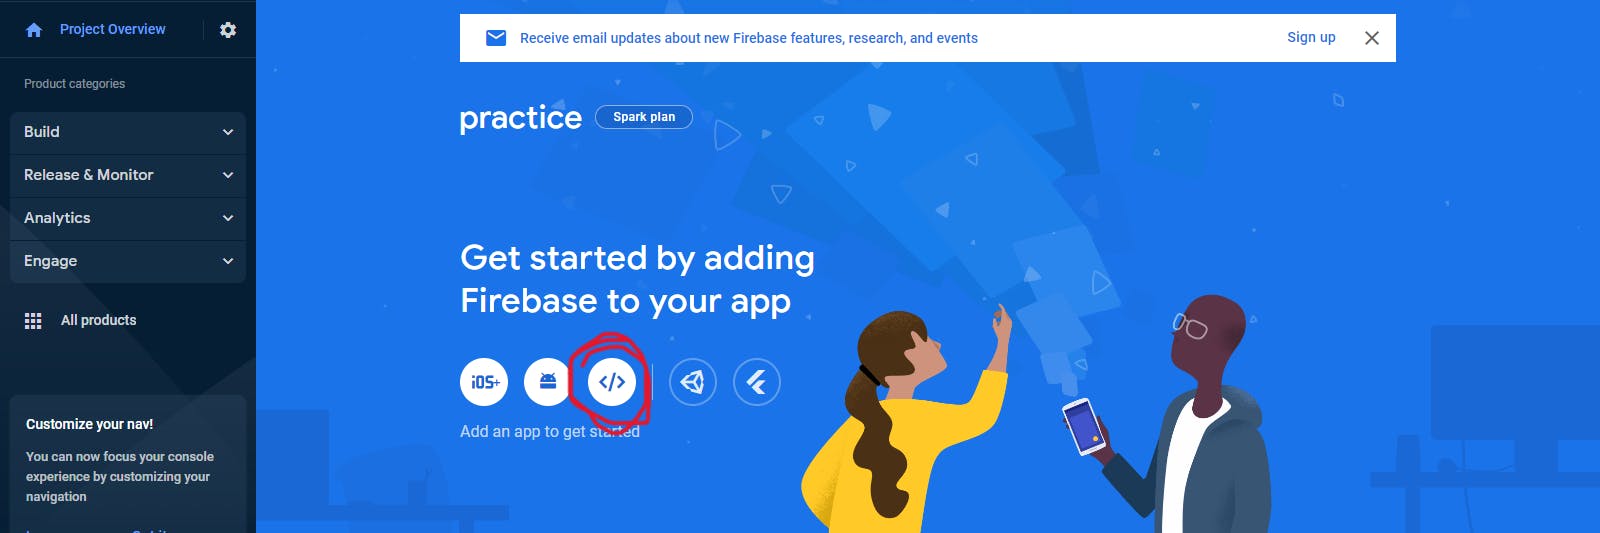
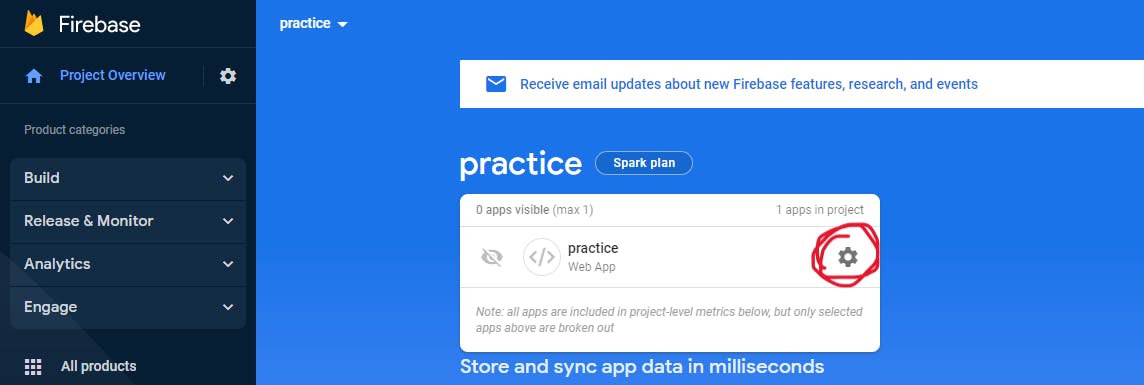
3) You will be directed to the home page of the project, and you will see a section that reads: Add an app to get started. Click on the web app option, which has this logo: </>, and is also circled in red in the picture below.
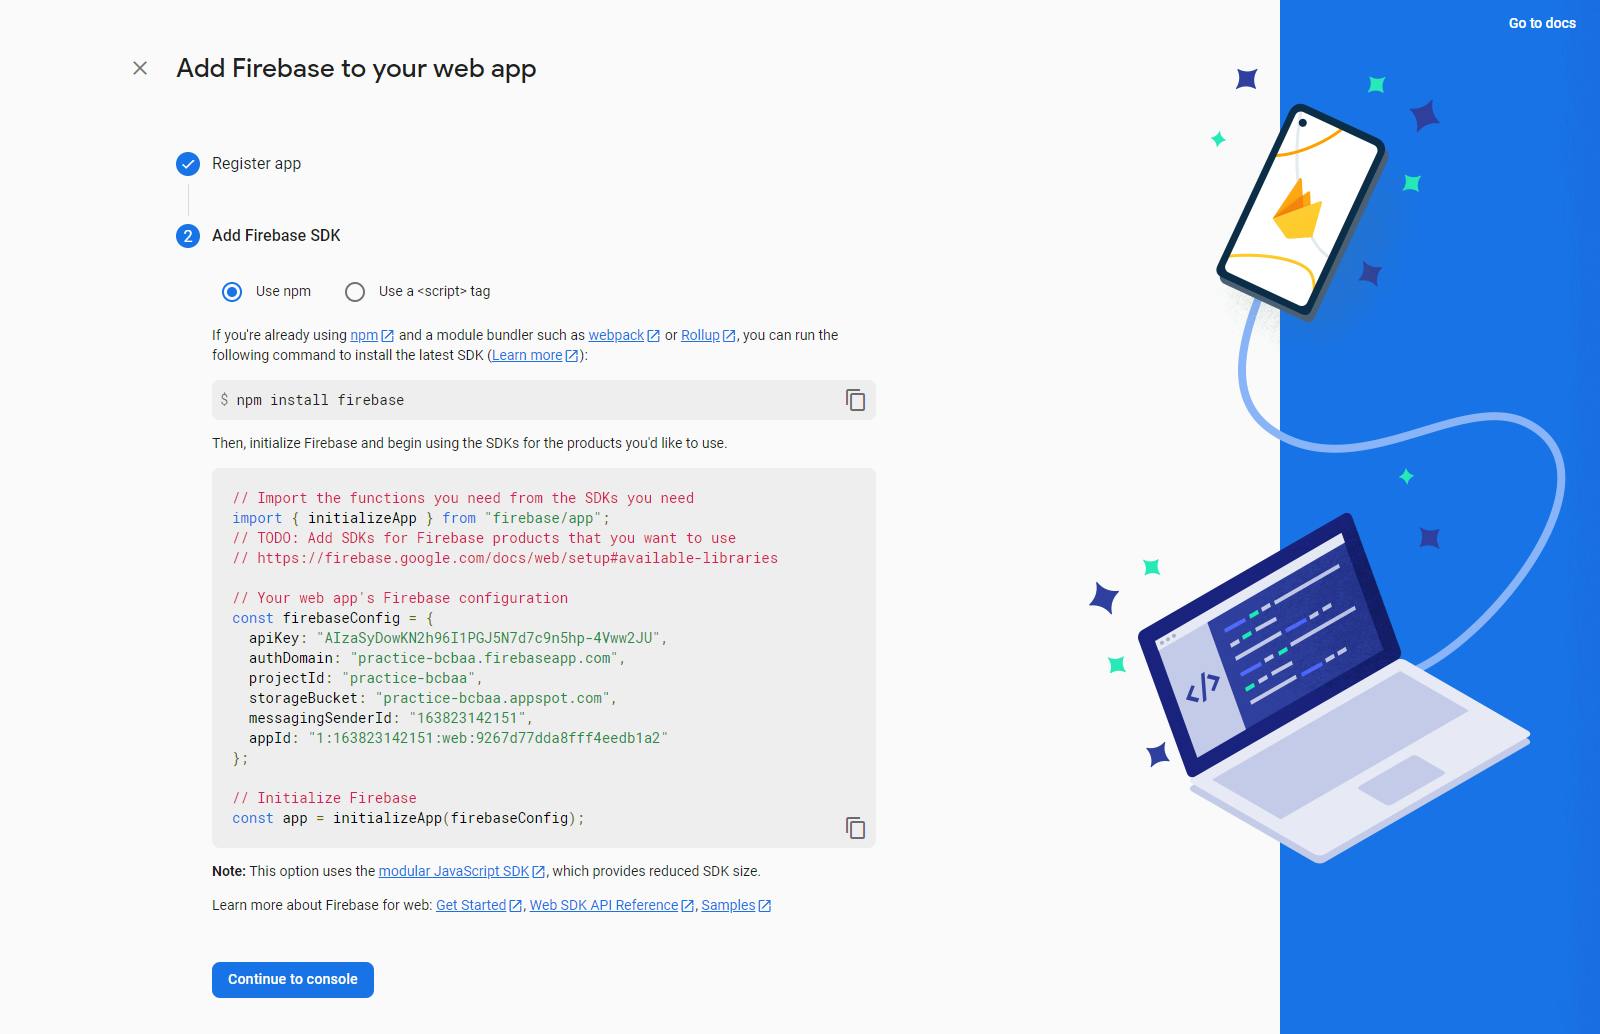
4) Register your app with a nickname, and in the Add Firebase SDK step, the firebaseConfig object will contain all the data you need to connect your Firebase project to your React project. Now, let's set up your React app!
Adding environment variables
1) Set up your React app as you usually would, and run the function the following function in your React project folder:
npm install firebase
2) Within your source folder, create a .js file to store your Firebase configuration. Your file should contain the following code:
import { initializeApp } from "firebase/app";
import { getAuth } from "firebase/auth";

// Reads the local environment variables that we will set up in the next step
const firebaseConfig = {
  apiKey: process.env.REACT_APP_FIREBASE_API_KEY,
  authDomain: process.env.REACT_APP_FIREBASE_AUTH_DOMAIN,
  projectId: process.env.REACT_APP_FIREBASE_PROJECT_ID,
  storageBucket: process.env.REACT_APP_STORAGE_BUCKET,
  messagingSenderId: process.env.REACT_APP_MESSENGER_SENDER_ID,
  appId: process.env.REACT_APP_FIREBASE_APP_ID
};

//Initializes Firebase within your application
const app = initializeApp(firebaseConfig)

// Provides the authentification data you will need
export const auth = getAuth(app);
export default app;
3) Now, within the root folder of your app, create a .env.local file. This type of file should automatically be in your .gitignore file, but if it isn't, make sure to add it. This is where you'll provide the values for the variables you named in the previous step. Your .env.local file should look like the example below, except you need to replace all the values with your own Firebase app's configuration data that you got earlier from Step 4 of the "Setting up Firebase" section of this tutorial, or that can also be found by going into your Firebase project web app's settings. Note how the values are not a string, but instead follow directly after the equal sign. Also note that your variables can technically be named anything, but need to start with REACT_APP_. If you are using Next.js, the variables will start with NEXT_PUBLIC_.
REACT_APP_FIREBASE_API_KEY=AIzaSyDowKN2h96I1PGJ5N7d7c9n5hp-4Vww2JU
REACT_APP_FIREBASE_AUTH_DOMAIN=practice-bcbaa.firebaseapp.com
REACT_APP_FIREBASE_PROJECT_ID=practice-bcbaa
REACT_APP_STORAGE_BUCKET=practice-bcbaa.appspot.com
REACT_APP_MESSENGER_SENDER_ID=163823142151
REACT_APP_FIREBASE_APP_ID=1:163823142151:web:9267d77dda8fff4eedb1a2
4) If you have already started the React app on your local machine, you will have to restart it for the environment variables to be read. Congratulations! Now we are ready to add our sign-in functions.
Adding sign-in functionality
Firebase Authentification provides ways to sign in with email and password, Google, Facebook, Apple, Github, and more. In this tutorial, I will cover how to allow users to sign in with an email and password, as well as with Google. If you understand how to use these two methods, you can add more sign-in methods as you like by reading the Firebase authentification docs.
1) You likely want all of your React project to access the authentification state, so we want to use a global state management tool. For this example, I will use React Context. Set up the .js file for you context as in the example below:
import { createContext, useContext, useState, useEffect } from "react";

const AppContext = createContext()

export const useAppContext = () => {
return useContext(AppContext);
}

// We will wrap our application with this component
export const AppProvider = ({children}) => {

//We will set this to the object with our user details once the user is logged in
const [currentUser, setCurrentUser] = useState();

const value = {
currentUser
}

return(
<AppContext.Provider value={value}>
{children}
</AppContext.Provider/>
)
}
2) Now, we will add sign-up, login, sign out, and delete user functions to our context file. At the top of the file we will add the following imports:
//Import any Firebase authentification functions you'd like to use
import {
createUserWithEmailAndPassword,
signInWithEmailAndPassword,
signInWithPopup,
GoogleAuthProvider,
signOut,
deleteUser
} from "firebase/auth"

// Import the auth variable from the file you created earlier in Step 2 of the Add environment variables section of this tutorial
import {auth} from "./firebase.js"
3) Within the AppProvider we will add the following functions:
// a variable we will need to sign in with Google
const GoogleProvider = new GoogleAuthProvider();

// Sign-up with email and password
const signup = (email, password) => {
return createUserWithEmailAndPassword(auth, email, password)
}

const login = (email, password) => {
return signInWithEmailAndPassword(auth, email, password);
}

const signInWithGoogle = () => {
return signInWithPopup(auth, GoogleProvider)
}

const signout = () => {
return signOut(auth);
}

const deleteAccount = () => {
return deleteUser(auth.currentUser)
}


// Sets our currentUser state to the logged-in user's data every time a user logs in
useEffect(() => {
const unsubscribe = auth.onAuthStateChanged((user) => {
setCurrentUser(user)});
return unsubscribe;
}, []);
If you want to add more functionality to the above functions, like checking if the user is new or handling errors, you can rewrite the functions with async/await as such:
const signup = async (email, password) => {
try {
const result = await createUserWithEmailAndPassword(auth, email, password)
//... use the result data for your desired functionality, or add more functions here
} catch(error) {
//handle errors here
}
}
4) Finally, add your functions to your value object, and you can use those functions within your components, making sure to pass email and password values to the signup and login functions.
const value = {
currentUser,
signup,
login,
signInWithGoogle,
signout,
deleteAccount
}
Congratulations 🎉 Now you know how to authenticate with Firebase! On to handling user-specific data...
🗄️Handling User-Specific Data
After you have your currentUser object when the user signs in, you can use the value of currentUser.uid to write user-specific data, and read it as well.
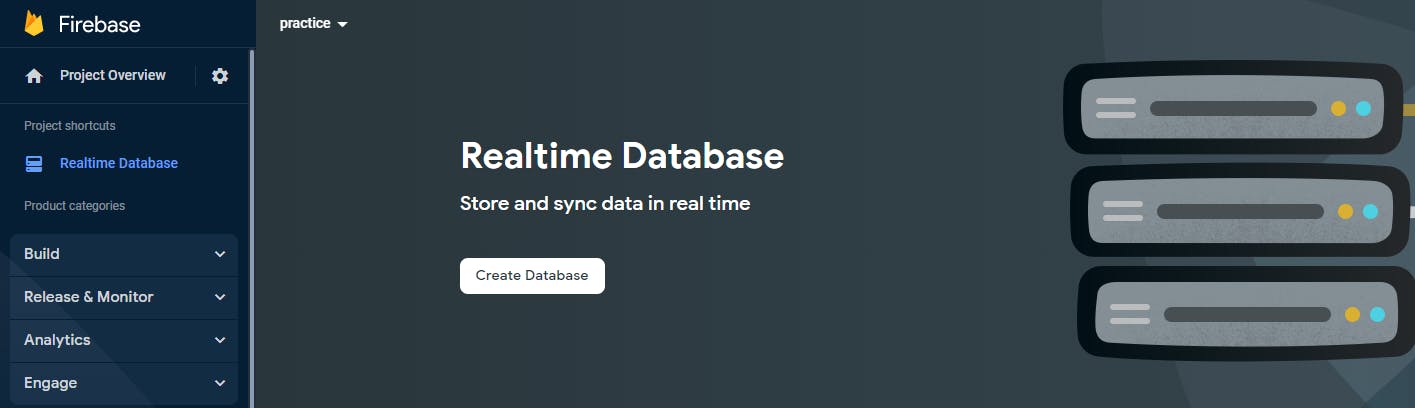
1) First, within your Firebase project, navigate to the Realtime Database option found underneath the Build tab in the navigation bar on the left side of the screen. Press the Create Database button to set up your database. If you want to practice reading and writing to your database without being signed in from your app, then you need to start in test mode. However, I would recommend testing writing and reading data while being authenticated, in which case you can start in locked mode.
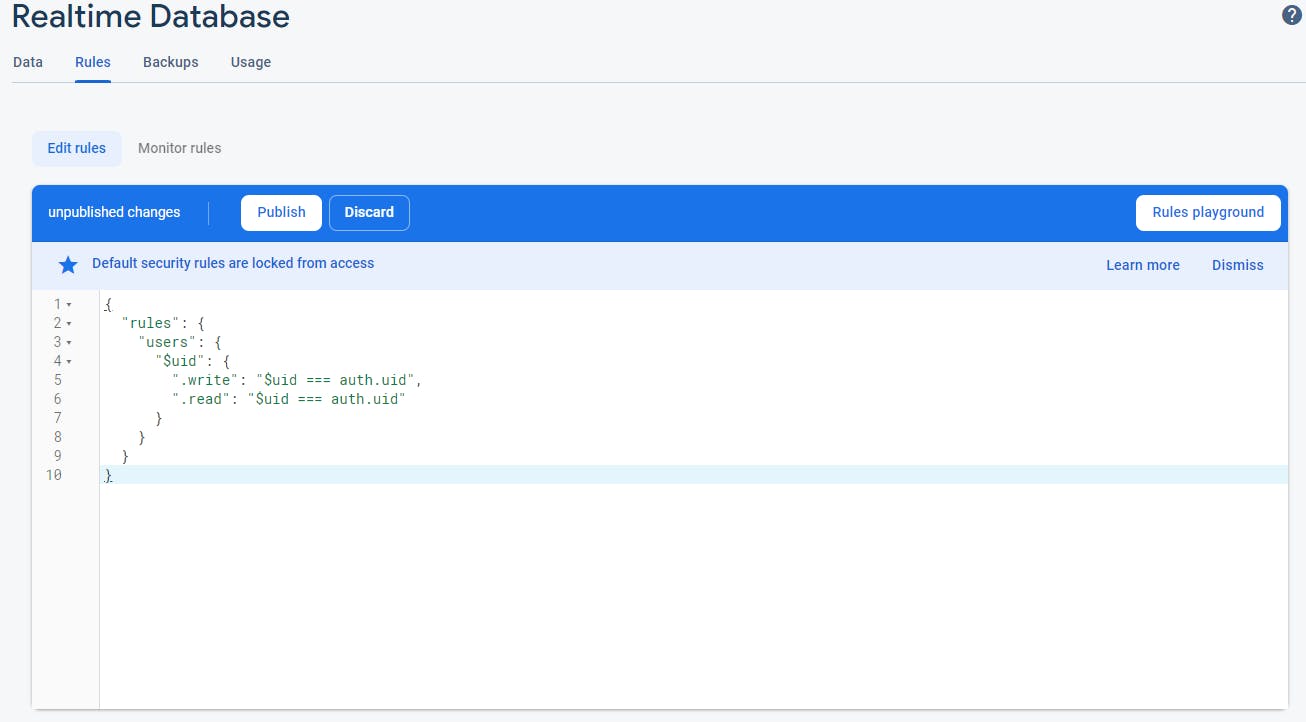
2) To write the appropriate security rules, you need to figure out how you want to organize your data. The Realtime Database essentially is just nested objects. In this example, let's say we want an object to store users, and within each user object we want to store the user's to-do list items. Then, we will write our database rules like this:
// The $uid is a variable to stand for the User ID's that the to-do list data will be stored under. The auth.uid is an automatic Firebase value that checks the User ID of the currently authenticated user.

{
  "rules": {
    "users": {
      "$uid": {
        ".write": "$uid === auth.uid",
        ".read": "$uid === auth.uid"
      }
    }
  }
}
Make sure to publish your security rules.
3) Next, we need to connect our React app to our Firebase database. Within a .js file in your React app, add the following code:
import {getDatabase} from "firebase/database";

// Get the app variable you created earlier in Step 2 of the "Add environment variables" section of this tutorial.
import app from "./firebase"

// Connects your React app with your Realtime Database
const db = getDatabase(app)
4) Finally, you can write, read, update, and remove data on your database. You can learn about all the ways you can interact with your database from the Firebase Documentation. In the following code block, I will provide an example of writing and reading to-do list data on our database.
import {useState, useEffect} from "react";
import app from "./firebase";
import {getDatabase, ref, push, onValue} from "firebase/database";

const db = getDatabase(app)

// Get the user ID from your currentUser state
const uid = currentUser.uid

const UserTodos = [
{task : "Finish writing tutorial",
complete: false
},
{
task: "Be amazing!",
complete: true
}
]

// Set up a reference to your database, and write to or read the data in a todos object stored under the user's unique ID
const todoRef = ref(db, `users/${uid}/todos`)

const writeUserData = () => {
for(let i = 0; i < UsersTodos.length; i++){
// pushes each todo object to the database with a Firebase generated ID for each todo
push(todosRef, UserTodos[i])
}

const [todos, setTodos] = useState()

useEffect(() => {

// watches for changes in the database at the location of your ref value, and returns a snapshot of all the data there
onValue(todoRef, (snapshot)) => {
const todos = snapshot.val();

// transforms the nested objects in the database to an array of objects
const todosArray = Object.entries(todos).map(([key, value]) => ({
key,
..value
}));

// set your todos state to the user-specific data stored in the Realtime Database
setTodos(todosArray)
}

}, [])
Summary
Now you can make endless app ideas that involve connecting a user to their unique data using React and Firebase!